And give it a mere ten minutes of my time so I could enjoy the instant satisfaction of crossing something off that endless list. That was on May 24th. My closet has been teetering on the edge of utility ever since. . But today is June 18th and it’s finally done!
I love this closet. The previous owner (whom I refer to as The Old Man) had the lower half of the stairs rebuilt. An avid do-it-himselfer, he got the brilliant idea to use the space under the stairs as a broom closet. The longer I’ve lived here, the more I’ve realized, however, that his brilliant ideas rarely translated into brilliant craftsmanship.
I don’t have a Before picture, but his closet was basically an opening between the studs and the wall (about 10 inches wide) with an old cabinet door slapped over it.
True craftsman have a great rule of thumb: measure twice, cut once. The Old Man felt he was above all that. He’d cut first, then realize his opening was way too large or too small for standard sized doors. So he had to jerry rig his way out. In this case he took an old cabinet door and slapped a piece of scrap wood on the bottom to make it long enough.
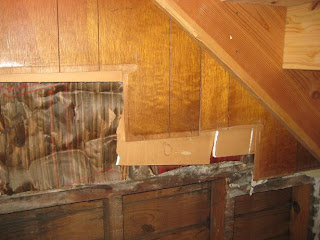
All told, the closet door was too narrow to even get a vacuum through, to short for a person to walk through, and too dark to see into. A total waste of space. So when my awesome friend Amy’s equally awesome husband offered to transform the space into a usable closet I was ecstatic. It has walls! It has a real door! It has lighting and an outlet! So I pulled out all the mess to hang the shelf. And that’s when I remembered this:
The one part of the closet that didn’t get finished. So my little ten minute shelf hanging project turned into a full scale insulating, drywalling, painting, and re-organizing project that spanned well beyond my vacation week. I both love and hate the results.
I hate it because, frankly, I could have done better. The walls were down to stud in some spots but other spots had plaster & lath and some even had wood paneling over that. Most of it ran under the stairs from above & couldn’t be ripped completely off. Did you ever try using a reciprocating saw while crouching under a stairway? Not fun. Kinda dangerous.
So the drywalling was done in pieces using scraps. Which meant it’s not flush and the mud job was half-arsed. If you look close, there are still plenty of gaps. But then again, it’s the back of a closet. Not exactly a place I show off to house guests. While it’s not a job to be proud of, it’s good enough to be functional.
You would NEVER use drywall pieces this small or leave gaps that big or let your surface be that bumpy!
But I love how organized it is now! Not only did I hang one shelf, I hung a whole section. I used removable shelving so I could still have easy access to the plumbing for the bathroom (on the opposite side of the wall).
I hung hooks so my brooms & whatnot aren’t a tangled mess.
And I hung a door spring under one of the stairs to hold my spare bags.
The green thing hanging there is a bag for my…bags. (Tutorial to come!).
Not only can I can get the vacuum into the closet, but I can walk in with it. My storage boxes are easy to pull in and out. And all my spare utility supplies are easy to find. Best part of all, the whole project only cost me $6.25 – for the spring and a pack of clips to hold the shelves. The shelving, paint, and drywall supplies were all leftovers in my stash.
Now I just need another vacation to tackle the 436,987,214 other things on my list.


No comments:
Post a Comment