CLICK HERE FOR FREE BLOGGER TEMPLATES, LINK BUTTONS AND MORE! »

Valient Viewers of Braver Homes and Gardens

Tuesday, June 22, 2010

Bag Bag


In my last post you got to see my utility closet re-do.  One of the things I did was to make a bag for my bags.  I've seen some versions of this before that have drawstrings on the bottom that you have to open and close every time you put in or remove a bag.  That's too putzy for me so I like make these with elastic on the bottom.  Here's what I did: 


All you need are
a) two strips of calico or craft cotton (mine were were 10" x 20")  (FYI - To clue you as to how bad a craft addiciton I have, this was a piece of cotton I bought 15 years ago back in high school.  I never dreamed, at age 18, that this would turn into a storage bag holder.  Funny where life takes you...).  

b) a hanger - child size are great
c) about 10" of elastic, give or take


1.  Place your pieces right side together.  Working with the end you ant to have as the top (one of the short ends) use pins and mark a one-inch opening in the center.  Sew this edge together, stopping at your pins so that, when you press your seam open, you have an opening like this:


2.  AFter pressing, adjust so the right sides are back together again.  Sew the long sides.  


3. On the short end that is fully open still, turn your ends under.  (I will assume you know how to finish your ends off properly, if you're a fanatic about that like I am).  When I say "turn your ends under" look at what I'm doing in this picture - I'm turning them under so that I'll form a casing big enough for my elastic to slip through.  You'll have to adjust your casing to suit the width of the elastic you use.

I find that 3/8" elastic works best.

4.  Once you've sized your casing, pin it.  Be sure to keep an opening big enough to slip your elastic in!  Then sew the casing.

5.  DECISION TIME:  Where will you hang your bag?  And how will you hang it? 
This decision will help you determin how to shape your hanger.  Here's a bag I made years ago for my basement:


You can see it hangs a) flush against the beam/wall and b) on a nail.  That's why I shaped my hanger like this:
The flat bend will hold the bag against the wall and leaving the hook part will work fine for a hanger. 

But for my utility closet, I was going to hang it a) suspended from the ceiling and b) on a cup hook.  So for this bag, I shaped the hanger like this:

Forming the hook of the hanger into a loop will keep it on the cuphook and the swiveled design will allow the bag to move without falling while mounted to the ceiling.  

So bend your hanger appripriately, then slip it into the bag and through the hole.   

6.  .  Take two large safety pins.  Stab one end of your elastic and pin that to your bag near your opening.  Stab the other end with your second pin, close it shut, and use it to run the elastic through:


7.  Adjust your elastic so that it's tight enough to hold bags in while allowing enough room for you to get your hand inside to either stuff a new bag in, or pull one out.  Cut off any excess.  Sew your elastic closed and close up the hole. 

8.  Stuff it with all your bags and hang it up!


Friday, June 18, 2010

In the Closet

My birthday week vacation is but a distant memory. I woke up on Day One with a to-do list a mile long. Coffee cup in hand, I looked at my utility closet and decided that the obvious first choice for a project would be the quick and easy task of hanging a shelf. All I wanted to do was take this:


And give it a mere ten minutes of my time so I could enjoy the instant satisfaction of crossing something off that endless list. That was on May 24th. My closet has been teetering on the edge of utility ever since. . But today is June 18th and it’s finally done!

I love this closet. The previous owner (whom I refer to as The Old Man) had the lower half of the stairs rebuilt. An avid do-it-himselfer, he got the brilliant idea to use the space under the stairs as a broom closet. The longer I’ve lived here, the more I’ve realized, however, that his brilliant ideas rarely translated into brilliant craftsmanship.

I don’t have a Before picture, but his closet was basically an opening between the studs and the wall (about 10 inches wide) with an old cabinet door slapped over it.

True craftsman have a great rule of thumb: measure twice, cut once. The Old Man felt he was above all that. He’d cut first, then realize his opening was way too large or too small for standard sized doors. So he had to jerry rig his way out. In this case he took an old cabinet door and slapped a piece of scrap wood on the bottom to make it long enough.

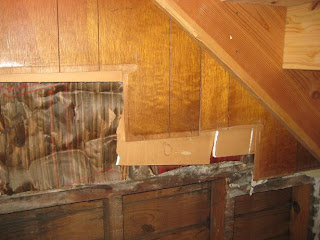
All told, the closet door was too narrow to even get a vacuum through, to short for a person to walk through, and too dark to see into. A total waste of space. So when my awesome friend Amy’s equally awesome husband offered to transform the space into a usable closet I was ecstatic. It has walls! It has a real door! It has lighting and an outlet! So I pulled out all the mess to hang the shelf. And that’s when I remembered this:


The one part of the closet that didn’t get finished. So my little ten minute shelf hanging project turned into a full scale insulating, drywalling, painting, and re-organizing project that spanned well beyond my vacation week. I both love and hate the results.

I hate it because, frankly, I could have done better. The walls were down to stud in some spots but other spots had plaster & lath and some even had wood paneling over that. Most of it ran under the stairs from above & couldn’t be ripped completely off. Did you ever try using a reciprocating saw while crouching under a stairway? Not fun. Kinda dangerous.


So the drywalling was done in pieces using scraps. Which meant it’s not flush and the mud job was half-arsed. If you look close, there are still plenty of gaps. But then again, it’s the back of a closet. Not exactly a place I show off to house guests. While it’s not a job to be proud of, it’s good enough to be functional.


You would NEVER use drywall pieces this small or leave gaps that big or let your surface be that bumpy!


But I love how organized it is now! Not only did I hang one shelf, I hung a whole section. I used removable shelving so I could still have easy access to the plumbing for the bathroom (on the opposite side of the wall).


I hung hooks so my brooms & whatnot aren’t a tangled mess.


And I hung a door spring under one of the stairs to hold my spare bags.


The green thing hanging there is a bag  for my…bags. (Tutorial to come!).

Not only can I can get the vacuum into the closet, but I can walk in with it. My storage boxes are easy to pull in and out. And all my spare utility supplies are easy to find. Best part of all, the whole project only cost me $6.25 – for the spring and a pack of clips to hold the shelves. The shelving, paint, and drywall supplies were all leftovers in my stash.

Now I just need another vacation to tackle the 436,987,214 other things on my list.


Wednesday, June 16, 2010

Bead and Button Show Projects


Just to show off a bit, here are the first few things I made with my newly acquired stash of beads from the Bead and Button show:

We watched a demonstration of how to apply paper to glass to create a pendant.  The lady at the booth let us each pick one for free and indicated we could attach a bale to it.  She had bags of bales and other whatnots to sell but she didn't even mention her stuff or encourage us to experiement with it.  Basically we got a freebie but weren't even encouraged to buy.  Not a very good salesperson.  But I appreciated the pendant.   I found matching beads and wrapped wire around the freebie to make this:


I was hoping to find some teardrop beads which I've never used before. I found these in a pretty blue. Added bonus, they're crystal so they get nice and sparkly.


This one I think I might restring to put the bigger beads closer together but either way I like the black and white swirls and even had enough leftover for a bracelet:


This one was a more understated one I made of two shades of olive green with enough beads leftover for two bracelets.


For pure fun I bought a glass elephant and managed to find some bead to match.  I'll have to be in the mood for something really wild to wear it but I couldn't resist that elephant. 


Between beading and trying desperately to stay on top of the garden I haven't had much time for sewing.  I sure do miss it.  But now that I have a new stash of beads, it's time to whip up some matching outfits. 

Sunday, June 13, 2010

Bead and Button Show


Hello, my name is Jillain and I'm a beadaholic.  This weekend was the 2010 Bead and Button Show.  My best girlfriend, Amy, and I have made it our annual girls' weekend every year for about the last six years.  She comes down from Up North on Friday night, we get up early for breakfast at the bagel shop, and get there right in time for the opening. 
Normally we leave in time for a late afternoon lunch of tuna sandwhiches at the Chocolate Factory but this year we had to skip lunch and go right to dinner since we were there so long.  We pride ourselves on having our routine down to a science - we even take a bathroom break at the end of the same aisle every year.  So we were a little confused why it took us so long to get out of there. 

Then we went back to my house and I unpacked what I bought:


Don't you just want to jump on top of it and roll around in them?  Accumulating all this was what took so long.  This is only my pile.  Amy's was equally as profound. 

It looks like I went gangbusters, but most of what I bought was to match up and use up stuff I already have at home.  I basically took all my pendants, strung them on a ring, and found beads to match.  I'll supplement with other beads I have on hand.  Here's some of what I found:


I love the gloss on that emerald pendant & the matte on the black set.

I want to EAT those orange circles.  And I thought the pink pendant would be the easiest thing to match but it was actually the hardest.  Go figure.


I've been walking around with that purple pendant for a few years.  It reminds me of those HUGE sweet 'n' sour candies they used to sell what I was a kid. 


I bought the green swan pendant at the show last year but didn't think to buy a match.  The leaf one reminds me of my gramma -she used to have several leaf shaped old-lady necklaces.

Amy and I always build in time for beading.  Because our meal timing was thrown off schedule, we were up until almost midnight beading.  Wild I know.  But then, we also closed the Olive Garden once, too, untamed girls that we are.  I'll show some of the things I made soon!