CLICK HERE FOR FREE BLOGGER TEMPLATES, LINK BUTTONS AND MORE! »

Valient Viewers of Braver Homes and Gardens

Showing posts with label crafts. Show all posts

Monday, January 16, 2012

Post-Christmas Discovery

I just finished cleaning up the last of the Christmas stuff.  I got a late gift from The Conductor's mom, which he brought home from his post-holiday visit.


Yum!!  A bag full of homemade goodies. Two kinds of chocolate covered pretzels and a tin chock full of these:
I liked the ones in the upper right with the chocolate drizzle the best!

The Conductor also got a set plus a few bags more of other treats.  We're working on the second tin and they're still just as fresh as when he brought it all home. 

Some wedding fun was also in the bag.  The Conductor's mom has a tradition of making treats for table favors for all of the family weddings and she made me some samples:


A white chocolate, a dark chocolate and a minty white.  Mmm! 

We tend to eat dessert in front of the TV so I had left the whole gift bag right on the coffee table. Of course, I save "good" bags to reuse again!  As we finished up the contents of my bag, I was just about to fold it up and stash it away. 

But then what did I spy.....with my little eye?


Ho-lee-cow!!!  There are BEADS inside the handles of the bag!!!  They were loose inside the plastic handles, just waiting to be repurposed.

Of course I ripped them right off. 

Then I felt bad for destroying a "good" bag - so I used my punching tool to punch out a ton of gift tags for next year.
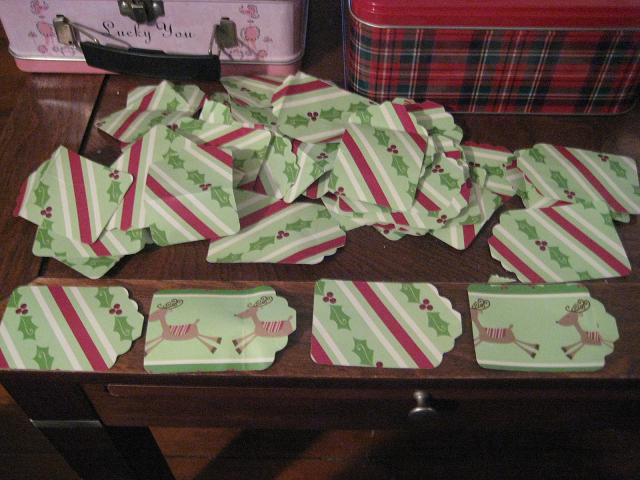

 The Conductor was next to me on the couch and he was urtterly fascinated by the fact that there's a tool out there to make gift tags.  He said to me, with total seriousness, "Wow.  You are *really* going to keep us in line when we're married."
Damn straight!

Anyway, in the post-holiday clearance sales, I picked up this earring set for $2.  I set the studs aside for my sisters since I don't wear earings.


What I really wanted were these earrings.  After removing the hooks, I had two matching charms which I ran jump rings through than strung up with the beads from the bag...


 ...to make this cute little necklace/bracelet combo:
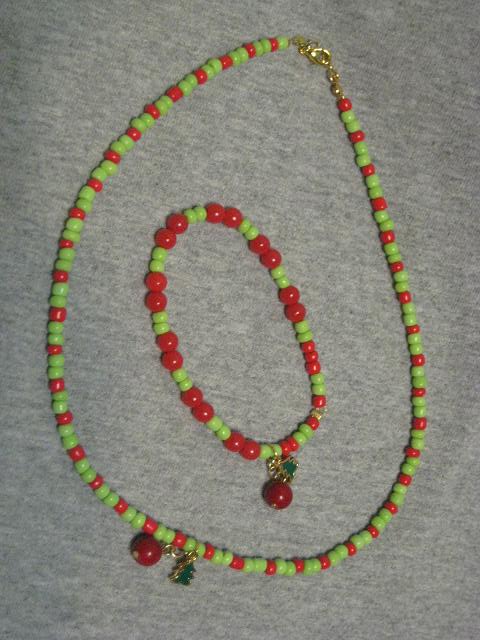
I only had half-enough beads from the bag to make the bracelet.  Fortunately I had some loose red ones in  my stash that gave me enough length. 

Too cute, hey?  I'm almost sorry Christmas is over because I'll have to wait a whole year to wear these.


And now a fun wedding update:  We're gearing up to send out save the date cards.  I went to the post office and asked for wedding themed stamps.  The guy said they had a ton in the back.  After a while, he came back in and said he's not allowed to sell those.  Um.  Ok...  So I said, "Well do you have anything pretty - flowers, hearts, anything like that?"

He says, "We're doing our stamp audit now so the only stamps I'm allowed to sell are these with the pretty American flag on them"

Seriously?  A stamp audit?  And isn't that ironic - that an AUDIT would hold up me - an accountant - from having pretty stamps on my first wedding mailing?  Ugh! 

Thursday, May 26, 2011

Measuring Tape

I love Menard's hardware store.  I willingly fall for their get-you-in-the-door gimmicks.  One that I particularly love are these measuring tapes.  They are FREE after a mail in rebate so I always pick up a few when I go in.


I was so touched that The Conductor seemed to be on the same wavelength as me as he spied them and commented, "Wow.  You have a lot of tape measures!"  His tone implied that he was impressed by the forsight I showed by having so many on hand.  I was about to proudly imform him that I got them all FREE, when he enthusiastically continued,  "You could put one in each room of your house!!"

I wanted to jump up and scream, "Yes!  Exactly!"  But before I could jump up with excitement, he sarcastically added, "Orrrrrrrr you could just pile them all around the toaster oven."  His back was to me but I'm pretty sure his eyes were rolling. 


Sigh.  So much for being on the same wavelength.  I finally got around to labeling them in such a way that I'll know just where to put them away when I'm done.  (As opposed to storing them in a pile by the toaster oven).
 

The one on top is for the utility closet, which is painted lite green.
Next is the one with the dress, for the hallway outside the sewing room.  The tape with the cars obviously goes in the car.
The back porch which always has a bug or two on it gets one.  My last name is Thomas, and like the train, I'm also a really useful engine so that one goes in my errand runing purse.  The last one goes in my step stool/tool carrier painted the same shade of Oriental blue.

But watch.  Now that I finally got them labeled and put away, I bet that smartypants Conductor won't even notice they aren't clustered around the toaster oven anymore.....

Tuesday, June 22, 2010

Bag Bag


In my last post you got to see my utility closet re-do.  One of the things I did was to make a bag for my bags.  I've seen some versions of this before that have drawstrings on the bottom that you have to open and close every time you put in or remove a bag.  That's too putzy for me so I like make these with elastic on the bottom.  Here's what I did: 


All you need are
a) two strips of calico or craft cotton (mine were were 10" x 20")  (FYI - To clue you as to how bad a craft addiciton I have, this was a piece of cotton I bought 15 years ago back in high school.  I never dreamed, at age 18, that this would turn into a storage bag holder.  Funny where life takes you...).  

b) a hanger - child size are great
c) about 10" of elastic, give or take


1.  Place your pieces right side together.  Working with the end you ant to have as the top (one of the short ends) use pins and mark a one-inch opening in the center.  Sew this edge together, stopping at your pins so that, when you press your seam open, you have an opening like this:


2.  AFter pressing, adjust so the right sides are back together again.  Sew the long sides.  


3. On the short end that is fully open still, turn your ends under.  (I will assume you know how to finish your ends off properly, if you're a fanatic about that like I am).  When I say "turn your ends under" look at what I'm doing in this picture - I'm turning them under so that I'll form a casing big enough for my elastic to slip through.  You'll have to adjust your casing to suit the width of the elastic you use.

I find that 3/8" elastic works best.

4.  Once you've sized your casing, pin it.  Be sure to keep an opening big enough to slip your elastic in!  Then sew the casing.

5.  DECISION TIME:  Where will you hang your bag?  And how will you hang it? 
This decision will help you determin how to shape your hanger.  Here's a bag I made years ago for my basement:


You can see it hangs a) flush against the beam/wall and b) on a nail.  That's why I shaped my hanger like this:
The flat bend will hold the bag against the wall and leaving the hook part will work fine for a hanger. 

But for my utility closet, I was going to hang it a) suspended from the ceiling and b) on a cup hook.  So for this bag, I shaped the hanger like this:

Forming the hook of the hanger into a loop will keep it on the cuphook and the swiveled design will allow the bag to move without falling while mounted to the ceiling.  

So bend your hanger appripriately, then slip it into the bag and through the hole.   

6.  .  Take two large safety pins.  Stab one end of your elastic and pin that to your bag near your opening.  Stab the other end with your second pin, close it shut, and use it to run the elastic through:


7.  Adjust your elastic so that it's tight enough to hold bags in while allowing enough room for you to get your hand inside to either stuff a new bag in, or pull one out.  Cut off any excess.  Sew your elastic closed and close up the hole. 

8.  Stuff it with all your bags and hang it up!


Wednesday, June 16, 2010

Bead and Button Show Projects


Just to show off a bit, here are the first few things I made with my newly acquired stash of beads from the Bead and Button show:

We watched a demonstration of how to apply paper to glass to create a pendant.  The lady at the booth let us each pick one for free and indicated we could attach a bale to it.  She had bags of bales and other whatnots to sell but she didn't even mention her stuff or encourage us to experiement with it.  Basically we got a freebie but weren't even encouraged to buy.  Not a very good salesperson.  But I appreciated the pendant.   I found matching beads and wrapped wire around the freebie to make this:


I was hoping to find some teardrop beads which I've never used before. I found these in a pretty blue. Added bonus, they're crystal so they get nice and sparkly.


This one I think I might restring to put the bigger beads closer together but either way I like the black and white swirls and even had enough leftover for a bracelet:


This one was a more understated one I made of two shades of olive green with enough beads leftover for two bracelets.


For pure fun I bought a glass elephant and managed to find some bead to match.  I'll have to be in the mood for something really wild to wear it but I couldn't resist that elephant. 


Between beading and trying desperately to stay on top of the garden I haven't had much time for sewing.  I sure do miss it.  But now that I have a new stash of beads, it's time to whip up some matching outfits. 

Sunday, May 30, 2010

Necklace Holder


My vacation's just about over.  BUMMER! Earlier in the week I took a trip up to visit my best friend.  We live almost three hours apart so it's hard to be spontaneous.  We usually meet roughly halfway at a coffee shop and sit and bead jewelry all day in between breaks for more coffee.  After about six hours, I did all this:
Not too shabby!!

But when I went to put them away, I remebered this mess:


All my long necklaces have nowhere to go since I only made holders for my dresser top - and they're all too low to accomodate the long necklaces. 

I found this neat little shelf at Goodwill, along with a plain old tie holder (not pictured):


I painted them both to match the colors of my wall and now I have this:


The upper handle actually opens a drawer.  Pretty cool!


Way better than a messy chair! 


Wednesday, April 14, 2010

Seeing Red

Yippee!  Tax time is over with.  I "got" refunds for all the people I did taxes for.  The last one is sealed up and on its way to Uncle Sam which means it's time to get back to more important things.  Like crafty stuff.  I sat at my kitchen table to do all this income tax nonsense.  And right next to me was this:

Is that nasty or what? 
I can't believe the Conductor continues to come over for my cooking with that thing lurking about. 
I've tried cleaning it millions of times with every product under the sun and the stains just don't come off.  So I decided to buy a new one.  Tarjay had similar ones for $8.  Call me cheap, but I think $8 is too much to spend on somthing that holds garbage.  What to do?  Well, I've seen lots of bloggers spray painting on plastic so I decided to give it a go:


Much better!  It matches my red kitchen walls and you can't see the stains.  Added bonus, I used a 50% off Coupon from Michaels so the paint only cost $3 with about half a can left for something else.  So $1.50 for a "new" garbage can is pretty darn good.  I just love how it looks.

But I love THIS view even better:

In other red events, the Conductor and I had dinner out the other night and came back for dessert.   I'm so itchy for my garden so this was a welcome sight:

Those are NOT fake strawberries with sugar on them.  And by fake I mean the storebought ones that are stiff as a board, and taste like nothing.  These are REAL strawberries grown in my yard that I froze from last year with some ice clinging to them.

Anyone that eschews fresh food and says that frozen foods or canned foods are "just as good" needs to come by and open up my container of frozen strawberries.  The first thing you'll notice is the BOLD RED color.   Real strawberries are supposed to be RED all the way through.  When was the last time you saw a completely red strawberry from the store?   Grocery store strawberries literally pale in comparison.  The second thing you'll notice is the smell.  Frozen since July, and still frozen as I worked with them, these berries gave off the most luscious smell - like I just picked them. 

You can't get real color and real odor out of a can. 

And you can't get REAL strawberry shortcake in April using frozen berries.  No sir.  I used the shortcake biscuit recipe from the 1963 edition of The New Good Housekeeping Cookbook.  I halved the recipe which gave just enough for two decent sized shortcakes. 
I threw the strawberries in a saucepan and sprinkled a handful of sugar over them and heated them up since they were still icy.  The sugar brought out the juices really nicely.  And it smelled delicous.  I also used REAL whipping cream with a bit of powdered sugar to make a chantilly cream.  I cut the biscuits in half, stuffed 'em with red and white.  And ended up with this:

Divine!